Sewing

pennant banner tutorial + free pattern

Hello everyone, As promised when I showed you the pictures of the nursery, here is a little tutorial for the big and the mini pennant banner I made for baby love.

pennant banner

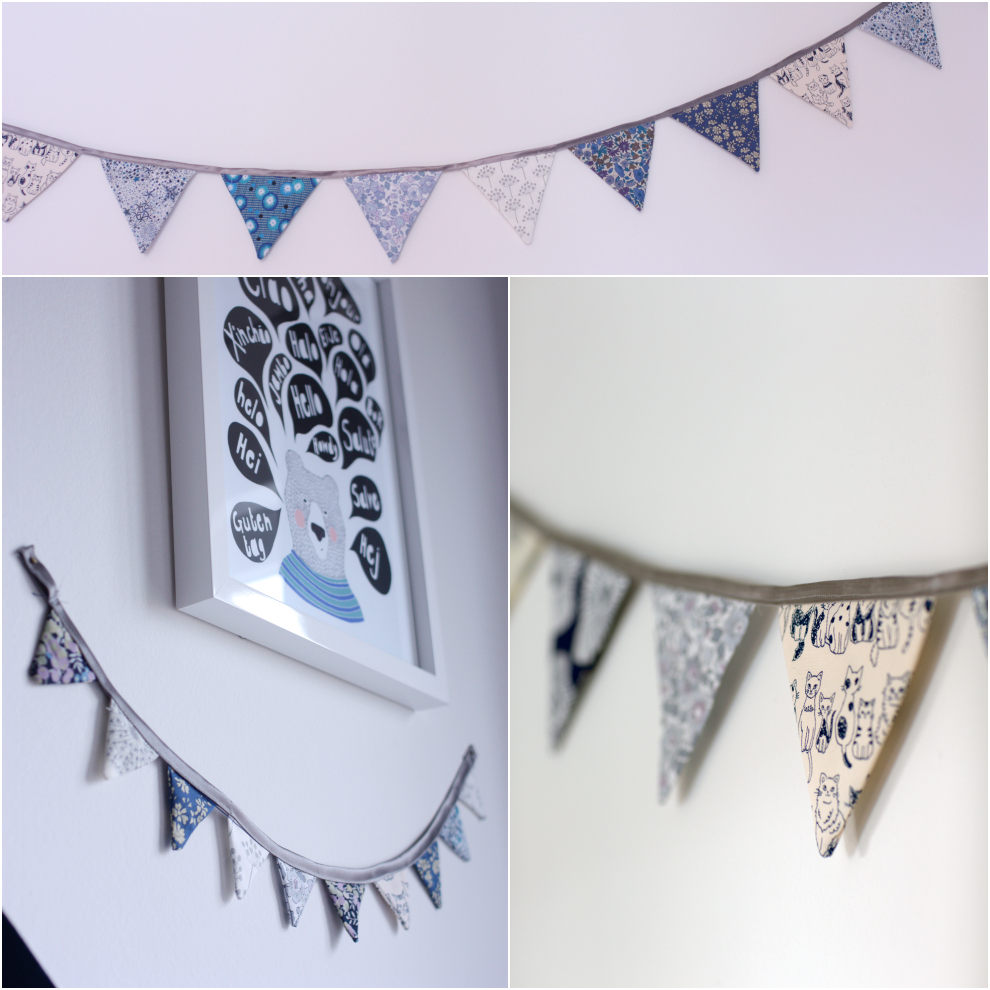
So here you go! It is a very simple project that will not take you more than an evening or a week-end to complete and that is suitable for beginners. I also made a mini-version of the pennant banner. You just have to use the smaller triangle and a smaller portion of bias tape. I made some pictures to illustrate the steps of the tutorial and a pattern to download:

FREE DOWNLOAD

Items needed for a two-metre pennant banner:

You will need:

  • the pattern (see above)
  • 32 fabric triangles (for 16 triangles). It is good to use leftover fabric pieces from other projects. You don't need 16 different fabrics - just be careful not to put the same pattern next to each other when you assemble the garland
  • 2.5 metre bias tape.
  • assorted thread (same colour as the bias tape)
  • a cutting mat and a rotary cutter (or some fabric scissors)
  • masking tape
  • a sewing machine
  • pins
  • iron and ironing board
  • 2 curtain rings to attach the banner to the wall.

pennant_Banner_1

Step 1: download the pattern, print it and cut it out. Place the pattern on your fabric on the cutting mat and fix it with masking tape. Step 2: cut your fabric. Always cut at least two of each pattern for both sides of your triangles. Step 3 - 4 : place your triangles' right sides against each other and sew them along the two longer edges.

pennant_Banner_2

Step 5: cut the point of each triangle with a pair of fabric scissors. Step 6: return your fabric on the right side. Step 7: iron your triangles flat. Step 8: iron one side of your bias tape flat and pin your triangles (2 to 3 pins per triangle) next to each other. Be careful when you assemble the banner not to put the same pattern next to each other and to have a harmonious succession of fabric. Sew on the fold of your bias tape. Leave at least 8 cm of tape on each side, so as to be able to attach your banner to the wall. Take away your pins.

pennant_Banner_3

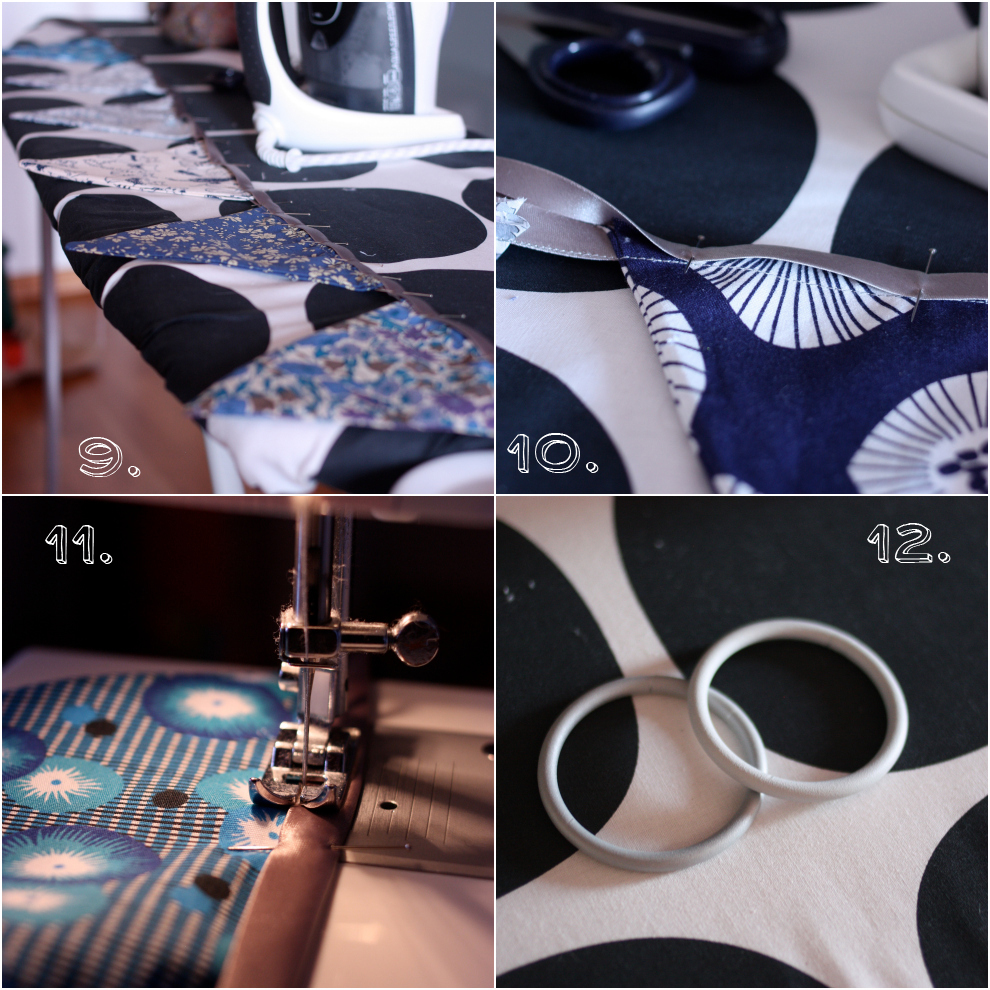
Step 9 - 10: with the help of your iron, fold your bias tape and pin it in place. Step 11: sew your bias tape as close to the edge as possible -  backstitch at the end. Step 12: attach the rings at each sides of the banner, and fix it to wall with simple nails.

Voila!

Take care and talk to you soon! (I really hope this time after the birth...)

Elodie

Pimping Baby Love's clothes - Iron transfer tutorial

Good morning! I am back today with another little DIY tutorial. Last week I presented you my little pink cloud body using stencil printing. Today I want to show you how to pimp baby (and adult of course!) clothes by using iron transfers. I bought these lovely transfers on the Isemarkt in Hamburg from the lovely shop kinder+raum. The designer Evy has got a stand on the market every Tuesday. It is of course also possible to buy the transfers online or in a couple of shops in Hamburg. Here is what I made for baby love and how it goes:

1. Select the pattern you want to transfer and the item of clothing.

2. Position the transfer on your fabric and place it on something hard - a wooden kitchen table would work better than an ironing board.

3. Place a sheet of baking paper between the fabric and the pattern before ironing. Set your iron to 150 to 160° C and press against the fabric with a lot of pressure for 20 seconds. It is important to press and not iron.

4. Peal off the plastic film et voila!

iron transfer step by step_1

Here are a couple of examples of what I did for baby love.

iron_transfer_step_by_step_2

pink

The colourful bodies are from petit bateau, the white body and kimono style t-shirt from C&A, and the muslim squares from Budnikowski. The patterns are from kinder+raum and the paper box is from Tiger

I hope you like it. It is a very easy and economical way of pimping your plain baby outfits and bodies. Take care and have a nice day.

Elodie

a touch of pink

It's been a very very rainy Sunday today here in Hamburg. In order to forget about it I wanted to give you a little bit a colour through my blogpost. I got inspired by a very cool project I am taking part in this week. It is called Post aus meiner Küche - (mail from my kitchen). I received a name and address of my "pen friend" last week and we both baked something for each other this week-end and will post it tomorrow. The motto was "very berry" (that's why my blog is pink). My little present is almost ready, but I'll post the pictures during the week, as it has to remain a surprise for my cooking partner. I can't wait to see what the postman is going to bring!I also felt like the right weather today to catch up with my sewing machine. I made my self a new scarf. I hope, you will like it.

★★★★★★★★★★★★★★★★★★★★★★★★★★★★★★★★★★★★★★★★

Aujourd'hui il a plu toute la journée à Hambourg. Alors pour oublier tout ça, j'ai décidé de colorer mon blog en rose. J'ai été inspiré par un super projet auquel je participe cette semaine et qui s'appelle Post aus meiner Küche (du courrier de ma cuisine). J'ai reçu le nom et l'adresse de ma "correspondante" la semaine dernière et nous avons du cuisiner un petit quelque chose l'une pour l'autre cet après-midi pour pouvoir le poster demain matin. Le thème donné était "very berry" (c'est pourquoi j'ai eu envie de faire un blogpost rose). Mon petit cadeau culinaire est presque prêt, mais je ne posterai les photos que pendant la semaine, car il faut que cela reste une surprise pour ma partenaire. J'ai hâte de voir ce que le facteur va m'apporter! C'était aussi une journée idéale pour passer un peu de temps à coudre. Je me suis cousue une écharpe. J'espère qu'elle va vous plaire.

a lazy Sunday afternoon

How was your Sunday afternoon? Mine was pretty cool. I spent the afternoon with my sewing machine listening to a podcast from the very inspiring Holly Becker about blogging. I did a Jewellery Roll I have been wanting to make for a long time - the result isn't perfect and I'll most certainly never sell it, but there you go - I really had fun making it! ★★★★★★★★★★★★★★★★★★★★★★★★★★★★★★★★★★★★★★★

Vous avez passé un bon dimanche après-midi? Le mien était excellent. J'ai renoué avec ma MAC en écoutant un podcast de l'excellente Holly Becker à propos de la blogosphère. J'ai réalisé une pochette à bijoux que je voulais faire depuis longtemps. Le résultat n'est pas parfait et ne fera sans doute jamais partie de ma collection Love On Delivery - mais j'ai passé un très bon moment!

Mister Cheddar had a pretty lazy afternoon too...

and we both wish you a beautiful week!

Der kleine Dachladen

So today I took part for the first time in a designer market: der kleine Dachladen and actually sold a couple of my stuff and not only to my friends! It was really fun to see how people like my products and I loved decorating my stand. ♥ ♥ ♥♥ ♥ ♥♥ ♥ ♥♥ ♥ ♥♥ ♥ ♥♥ ♥ ♥♥ ♥ ♥♥ ♥ ♥♥ ♥ ♥

Aujourd'hui, j'ai participé pour la première fois à une vente de créateurs à Hambourg: der kleine Dachladen (la petite boutique dans le grenier) et j'ai même vendu des trucs à d'autre personnes qu'à mes amies! C'était super interessant d'avoir un feedback sur mes produits et j'ai adoré décorer mon stand.

Hier sind ein paar Eindrücke: Voici quelques impressions:  

Cupcakes by Stücke vom Glück

 a lovely bird by Frei some space invaders by Kleinod

and here is my L.O.D. - Love on Delivery stand:  

product photography - first try

As I will be selling my L.O.D. stuff for the first time at the "kleiner Dachladen" (the little roofshop) on May 19th, I need to have some nice photos of my products for the promotion of the event. I will be posting more information about the event soon.After trying a lot of different angles and backgrounds, I decided to shoot the products on a black background with my dear rabbit-pin cushion as visual unifier - and I think it works pretty well. What do you think?